GETTING THE BEST PLASMA CUT RESULTS
When plasma cutting, getting the best results largely depends on 3 main factors: torch height, feed rate, and amperage. You can compare this relationship to the variables of a milling job where getting the best results is largely based on the depth of cut, the feed rate, and the RPM of the cutter. While there are many resources online to get you close values when plasma cutting, it may take some trial and error to get the optimum settings for your particular material, machine, and consumable quality. In the following examples, we discuss various cut quality issues and how you can correct them. In all examples, it is assumed that the airflow (from your air compressor) is constant and your machine is well maintained.
WHAT IS DROSS?
When plasma cutting, it is common and normal that an edge, called "dross", remains on one or both sides of the workpiece. This can be due, for example, to changes in speed that can occur during a change in direction. Based on the dross formation, conclusions can be drawn that are helpful when optimizing cutting values. Having the optimal cutting values will minimize the formation of dross, however, you will never eliminate it. It is a common result of plasma cutting. Below we will discuss some common dross results and how to minimize the formation of dross.
NOTE: It is important to note that you should only make one adjustment at a time and then make a test. If you change multiple things at once before testing you might make one thing better with one setting but then make it worse by the incorrect second setting.
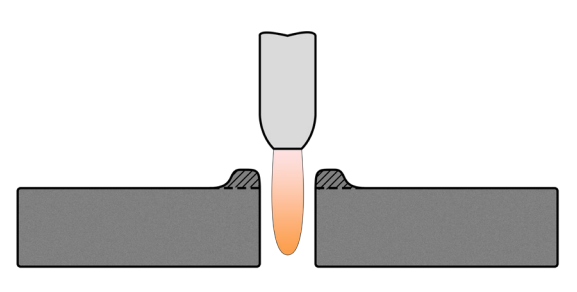
EXCESSIVE TOP DROSS
A strong formation of dross on the top of the material occurs when the torch is not close enough to the workpiece or the feed rate is too fast. This dross is typically easy to remove with a chisel, wire brush, or grinder with a sanding disc.
STEPS TO SOLVE:
-
Torch Height: To reduce the amount of top dross, you can lower your torch height closer to the material. This is done in your Sheetcam operation settings. It is recommended to start with .06" as a starting cut height. Once you verify that your cut height is correct or make an adjustment to that setting, perform another test cut and see if it is better.
-
Feed Rate: If not, then you should reduce your feed rate, also from Sheetcam operation settings. Start by reducing by 10 in/min at a time. Once you notice you have the least amount of dross, you can further adjust the feed rate by 5 in/min until you get the best results.
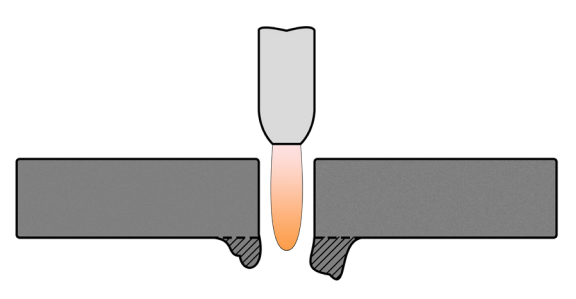
EXCESSIVE BOTTOM DROSS
Strong but easily removable dross deposits on the bottom of the material occur mainly when the feed rate is too slow, the Z-height is too low or the amperage is too high. When this happens it will look like the plasma arc is rushing ahead of the gantry and removing material. A low feed rate and/or your torch height being too low can also cause your torch tip to prematurely wear out. Lastly, if your amperage is too high, you will be inducing a lot more heat into the workpiece than needed causing excessive material to be melted and deposited on the bottom side of the part.
STEPS TO SOLVE:
-
Torch Height: To reduce the amount of bottom dross, first you should verify that your torch height is correctly set. A setting of .06" is a good place to start.
-
Check Material: Also, make sure your material is not deformed on the top surface. Excessive deformation or waviness of the material will vary the torch height as it is cutting. If you can not resolve this, either get a new piece of material or set your cut height higher. This will most likely produce more top dross but it will also reduce the likelihood that you crash the torch tip into the material.
-
Amperage: Next, verify that you have the correct amperage setting on your plasma cutter for the material that you are using. There are a lot of charts you can find online to help you obtain a good starting point.
-
Feed Rate: Lastly, try increasing your feed rate. This is done in your Sheetcam operations setting. Increase by 10 in/min to start until you start to see less dross. Then you can "fine tune" by varying the speed by 5 in/min until you see the best results.
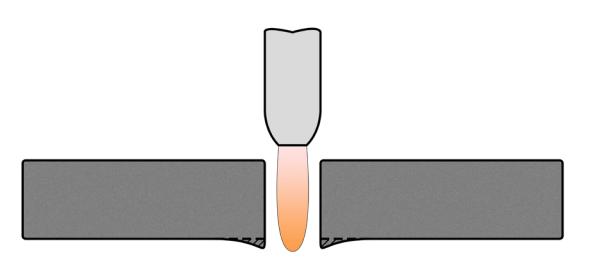
SMALL, HARD-TO-REMOVE BOTTOM DROSS
A small but difficult-to-remove bottom dross formation can occur when the feed rate is too high, the cut height is too high or the amperage is too low. You will notice a small thin line of dross forming on the bottom of the material close to the cutting edge. When cutting it will look like the plasma arc is lagging behind the movement of the gantry.
STEPS TO SOLVE:
-
Torch Height: To resolve this issue, you should first check to see that you have the correct cut height set in Sheetcam operations.
-
Check Material: If you have the correct setting, then verify that the material you are using, as with the above excessive dross issue, is not warped and is relatively flat. Material that is not flat or is excessively warped can cause all sorts of problems with the cut quality and dross build-up.
-
Amperage: After verifying that, check to see that your amperage setting on the plasma cutter is set to the recommended power setting for the material that you are cutting.
-
Feed Rate: If both of those things still do not resolve the problem then reduce the feed rate in your Sheetcam operations setting by 5 in/min and repeat the test cut until your results improve.
WHAT IS CHAMFER ANGLE?
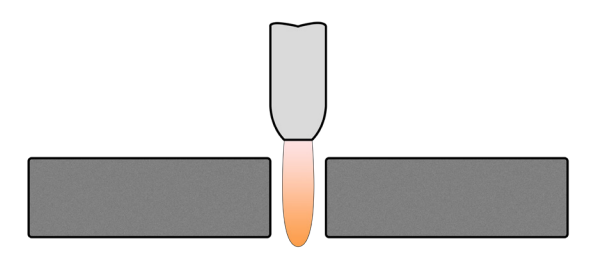
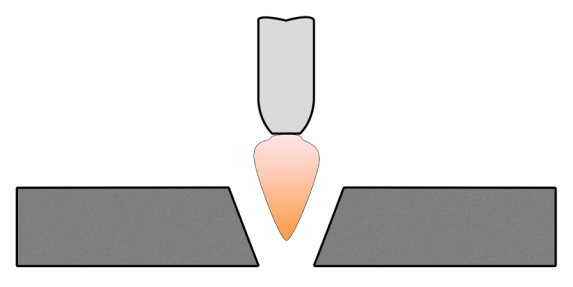
When cutting with a plasma cutter, it is common to see a slight angle on the side walls, especially on thicker materials. This is largely due to the shape of the plasma arc. You will find it to be less noticeable on thin materials. If you are noticing too much chamfer angle when you cut out your parts, there are some things below that you can try to help minimize any angles on your cuts. Above is an example of what we would consider an ideal chamfer angle when you cut your parts.
POSITIVE CHAMFER ANGLE
A positive chamfer angle occurs when the torch height (Z-height) is set too high, or too far away from the material. It can also happen when the feed rate is set too fast. When the torch is too high you are cutting with the tip of the plasma arc and the cutting profile resembles more of a V-bit when routing. When the feed rate is too fast, you are not letting the arc go all the way through the material evenly so you are melting away more material from the top than you are from the bottom of the cut.
STEPS TO SOLVE:
-
Torch Height: To resolve this issue, you should first check to see that you have the correct cut height set in Sheetcam operations. Try lowering the cut height by a small amount at a time until you see the angle improve. Be sure not to lower it below .06". If you are at this minimum cut height and you are still seeing this type of chamfer angle, then check your feed rate.
-
Feed Rate: Reduce the feed rate in your Sheetcam operations setting by 5 in/min and repeat the test cut until your results improve.
-
Check Material: If you have the correct setting, then verify that the material you are using, as with the above excessive dross issue, is not warped and is relatively flat. Material that is not flat or is excessively warped can cause all sorts of problems with the cut quality and dross build-up.
NEGATIVE CHAMFER ANGLE
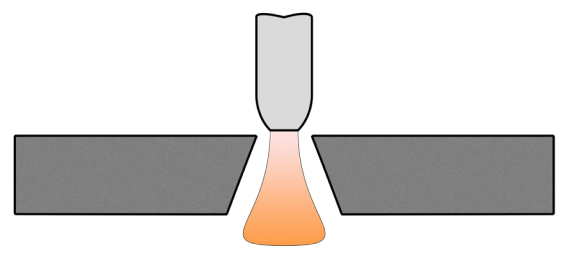
A negative chamfer angle can occur when the torch height (Z-axis) is too low or is too close to the material. It can also be the result of your feed rate being too slow. When the torch is too low you are cutting with the top part of the plasma arc and the cutting profile looks more like a dovetail when CNC routing. The other issue you can have when running the torch too close to the material, is you risk the tip of the torch crashing into the material. When this happens it can lower the lifespan of the tip or it can damage it instantly. If you run your feed rate too slow you can also see a result like this where you are cutting through the top of the material correctly but melting away too much material from the bottom of the cut.
STEPS TO SOLVE:
-
Torch Height: To resolve this issue, you should first check to see that you have the correct cut height set in Sheetcam operations. Try raising the cut height by a small amount at a time until you see the angle improve. If your cut height is more than double the material thickness and you are still seeing this type of chamfer angle, then check your feed rate.
-
Feed Rate: Increase the feed rate in your Sheetcam operations setting by 5 in/min and repeat the test cut until your results improve.
-
Check Material: If you have the correct setting, then verify that the material you are using, as with the above excessive dross issue, is not warped and is relatively flat. Material that is not flat or is excessively warped can cause all sorts of problems with the cut quality and dross build-up.
UNDEFINED CHAMFER ANGLE
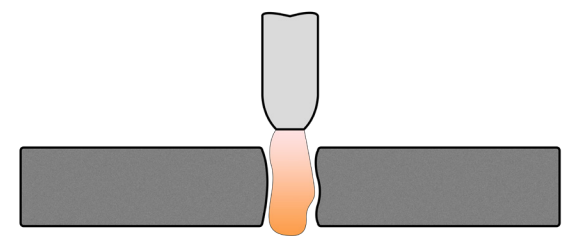
When you start to see the edges of your cuts where each side is different or you see a very inconsistent profile, it is most likely your consumables, such as your electrode or tip (nozzle). This can also happen if you have too much water in your air line.
STEPS TO SOLVE:
-
Inspect/Replace Your Electrode: Check the electrode on your torch. You can do this by unscrewing the cap at the end of the torch and removing the tip (nozzle). The electrode should have a small dimple at the tip of it and should have a uniform look around the tip. If it is burned away or there is any kind of a bevel, then you need to replace it. This can happen by firing the torch while the tip (nozzle) is touching the material. It is less common for the electrode to go bad which is why I suggest checking this first.
-
Inspect/Replace Your Torch Tip (Nozzle): Check the end of the torch tip (nozzle). You should see a small round hole in the bottom where the plasma jet comes out. The bottom of the tip should be smooth and uniform as well. If the hole is oval-shaped or, in comparison, is much larger than a new tip, then replace it. This is done by unscrewing the cap at the end of the torch and pulling the nozzle out. It should be friction-fit in the torch.
-
Inspect Your Air Line/Supply: If neither of the above suggestions solved the problem, you need to look at your air line/supply. Water is the enemy of plasma cutting. The CUT 50 plasma cutter comes with a water separator/pressure regulator that mounts on the back of the unit. The supply line from your compressor goes in one side and the other side goes into the plasma cutter. This will do a decent job removing small amounts of moisture from your air line, but if your compressor has a lot of water in the tank, you might need to look for an air filter that is a little more robust. We suggest this ONE from Amazon as it works really well with plasma cutters. You should also make it a habit to drain your compressor's tank at least once a week and more often if you are in a warmer and more humid climate.
SIDE VIEW CUTTING EDGE
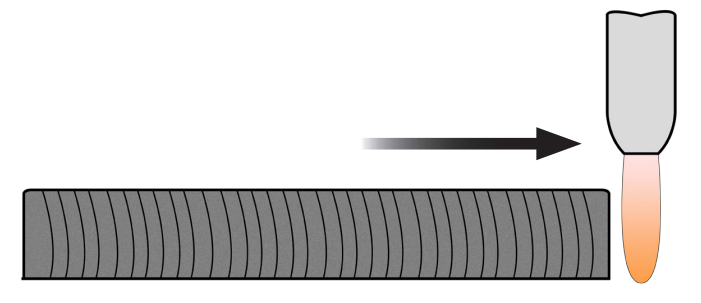
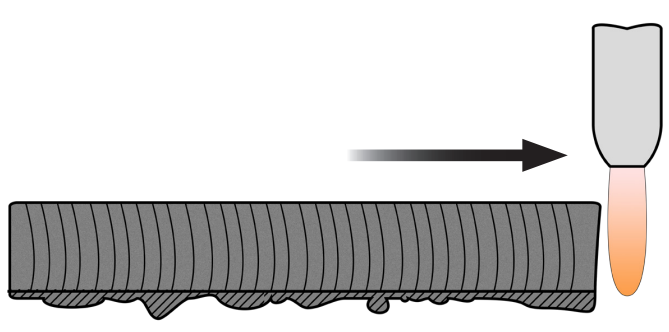
The above illustration shows the edge of the cut with a properly configured cut height and feed rate. The cutting lines on the edge of the part are running almost vertically.
FEED RATE IS TOO LOW
When the feed rate is set too low, you will still get vertical cut lines but you will have an excessive amount of dross build up on the bottom of the part. If you were looking at this cut profile from the front view, you will notice a clear negative chamfer angle (as described in the above section).
STEPS TO SOLVE:
-
Feed Rate: Increase the feed rate in your Sheetcam operations setting by 5 in/min and repeat the test cut until your results improve.
-
Check Material: If you have the correct setting, then verify that the material you are using, as with the above excessive dross issue, is not warped and is relatively flat. Material that is not flat or is excessively warped can cause all sorts of problems with the cut quality and dross build-up.
FEED RATE IS TOO HIGH
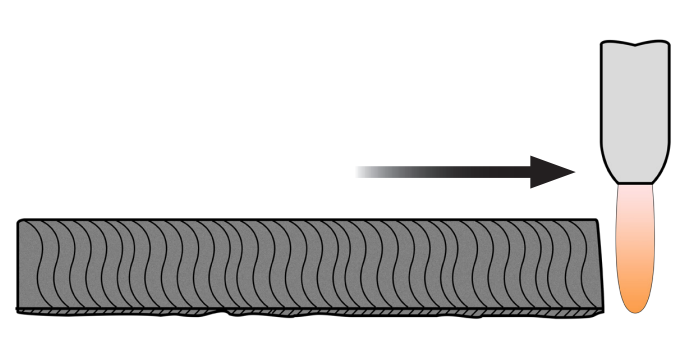
When the feed rate is set too high, it produces a cutting-edge pattern where the lines resemble the letter "S". You will notice a narrow dross forming on the bottom of the part. This dross will be difficult to remove. If you look at the cut profile from the front view, you will notice a clear positive chamfer angle (as described in the above section).
STEPS TO SOLVE:
-
Feed Rate: Reduce the feed rate in your Sheetcam operations setting by 5 in/min and repeat the test cut until your results improve.
-
Check Material: If you have the correct setting, then verify that the material you are using, as with the above excessive dross issue, is not warped and is relatively flat. Material that is not flat or is excessively warped can cause all sorts of problems with the cut quality and dross build-up.